

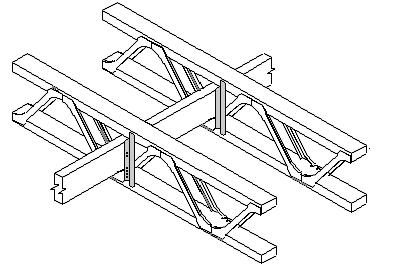
Posi-STRUT Truss System
Installation
This section is for the builder to use on-site. It may be printed off and supplied with the Posi-STRUT trusses.
Handling & Storage
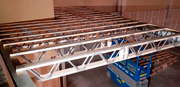
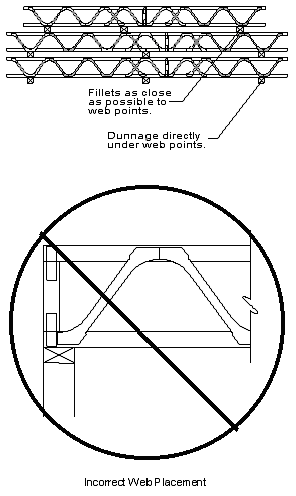
The Posi-STRUT trusses should be strapped and stacked upright with the bottom chord clear off the ground and on level fillets or dunnage directly underneath web points. Trusses may be stacked on top of each other with fillets aligned as closely as possible to web panel points.
The Posi-STRUT trusses should not be left exposed to weather for extended periods of time without adequate protection. If covered, adequate air circulation should be ensured around the trusses.
Care should be taken when handling the truss not to bend, collide, twist or drop. Handling should be confined to the timber chords, and no weight should be applied to the metal webs which could cause buckling.
Any truss damaged in transport or handling cannot be repaired on site without the advice or approval of the manufacturer.
Strongback Installation
The proper installation of the strongbacks (for floor trusses) is important to minimise floor bounciness. The recommended size of strongback is:
.
Posi-STRUT web Recommended Strongback Size PS20 90x45 PS25 140x45 PS30 140x45 PS40 190x45
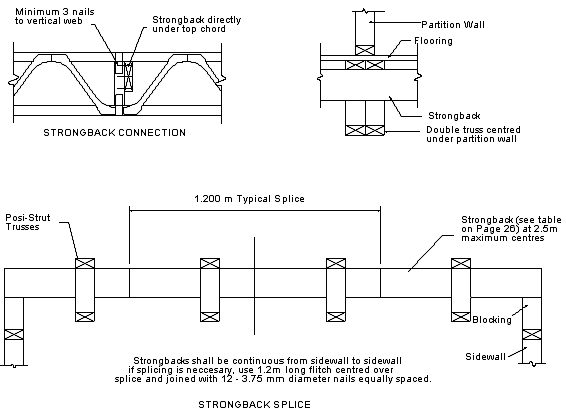
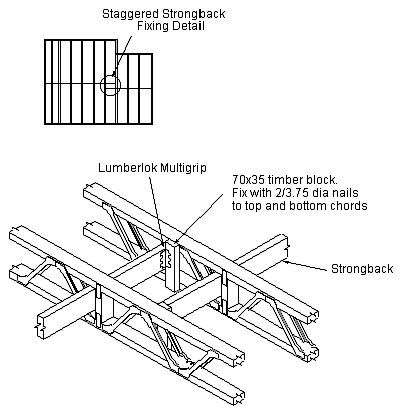
We recommend that strongbacks are clamped to the top chord and fixed to vertical webs with 3 x 3.75mm dia nails. At the end of buildings they should be braced back to top and bottom chords with diagonal strutting or with solid blocking.
.
.
Using Posi-STRUT Back Braces
The Back Brace allows quick and easy fixing of strongbacks to Posi-STRUT trusses without the need for timber vertical webs. The Back Brace also allows a degree of flexibility in the positioning of strongbacks as they do not need to be placed at truss panel points. This enables small variations in span to be accommodated without changing jig settings or strongback locations.
- Insert strongbacks through trusses in accordance with the floor plan provided by Posi-STRUT truss designer. Ensure that the strongbacks are no greater than 2.5 metres spacing from supports or other strongbacks. Select where possible an opening in the truss which allows the strongback to rest on the bottom chord away from the Posi-STRUT web tooth cluster.
- Place the Back Brace in position so that the leg with multiple holes is against the strongback and the vertical position is such that the screw holes in the leg against the Posi-STRUT truss are close to the centres of the timber chords. Fix bottom of Back Brace to bottom chord with 1 screw while maintaining strongback location.
3. Fix Back Brace to strongback with 2 screws, selecting a pre-punched hole which is is approximately 30mm from the top and bottom edges of the strongback.
4. Fix Back Brace to top chord with 1 screw through hole provided.
Note: Do not over tighten the screws.
.
.
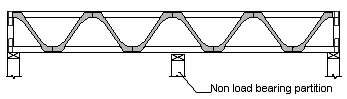
Clearance Over Non-loadbearing Internal Walls
Posi-STRUT floor trusses on the upper storey of multi-storey dwellings should be kept clear of internal non-load bearing walls of the lower storey.
It is recommended that the floor trusses be connected to these internal partition walls in order to provide lateral stability to the wall below with fixings that will also allow the trusses to deflect under load.
Internal walls should be level to enable truss camber to provide clearance between the wall and truss.
Do's & Don'ts
1. Trusses are not to be modified in any way on site without the approval of the manufacturer.
2. Trusses are not to be subject to excessive construction loads eg no stacks of concrete tiles or particle board.
